Last reviewed November 2026
Most handgun iron sights are regulated at the factory for one of three sight pictures: a 6:00 hold (the bullseye sits right on top of the front sight post), a center-hold (the flat top edge of the front post cuts straight across the middle of the bullseye), or combat-sighting (the front sight dot covers the bullseye directly). If your shots consistently group a couple of inches low with a new pistol, you may not be doing anything wrong with your hands at all: you are often using a center-hold on a handgun that was zeroed at the factory for a combat hold.
Want This as a Printable Range Handout?
Save or print our free two-page, full-color reference sheet covering all three sight holds, six common iron sight layouts, and six range alignment tips.
• Download the 2-Page Iron Sights Guide (PDF) →
The Three Standard Handgun Sight Pictures
Before you blame your grip or start tapping your rear sight with a brass punch, figure out which sight picture your pistol was built around. Across all three holds, one rule never changes: the top edge of your front sight post must sit perfectly level with the top of the rear sight, with equal slivers of light on the left and right sides of the post. The only thing that changes is where that aligned sight picture sits on the target.

I. 6:00 Hold
With a 6:00 hold (sometimes called a target hold), the flat top edge of your front sight touches the very bottom (6 o'clock) edge of the bullseye. The entire bullseye remains visible above your sights, while the bullet impacts dead center inside it. This setup is built for slow, deliberate bullseye shooting on known target sizes at fixed distances, which is why you see it mostly on rimfire target pistols and match 1911s.
- Common factory examples: Ruger Mark IV Target, Browning Buck Mark, Smith & Wesson Model 41, and Colt Gold Cup Trophy.
II. Center-Hold
With a center-hold, the flat top edge of your aligned sights bisects the center of the target horizontally. Half the bullseye peeks above the front sight post, and the bullet impacts right along that crisp top edge. A center-hold works across different distances and target sizes without forcing you to guess how far below the bullseye to aim.
- Common factory examples: HK VP9 and USP, CZ 75 and P-10 series, Springfield Hellcat and standard 1911s, and Glock Gen 1 through Gen 4 pistols.
III. Combat-Sighting
With combat-sighting (also called a cover hold), you place the front sight dot directly on top of the exact spot you want to hit. Because both eyes stay open, your brain superimposes the sights over the target and the round strikes directly behind the dot. Most modern defensive and duty handguns ship from the factory regulated this way because it is fast to pick up under stress and intuitive in low light.
- Common factory examples: Glock Gen 5, Smith & Wesson M&P 2.0 and Shield, Beretta 92FS and M9, and Walther PDP.
Note on factory zero: Manufacturer holds are starting points, not laws of physics. Shooting distance, sight height variants, and bullet weight (for example, switching between 115-grain range ammo and 147-grain defensive loads) can all shift your point of impact vertically. Read our 9mm 115gr vs. 124gr vs. 147gr Ammo Guide for how bullet weight affects recoil and impact.
Six Common Iron Sight Types (And How to Read Them)
Factory and aftermarket iron sights come in several visual layouts. Beginners often assume every pistol has three white dots, then feel completely thrown off the first time they rent a Glock or pick up a pistol with a plain black rear sight. Here are the six configurations we see most often on the range at RifleGear in The Colony.
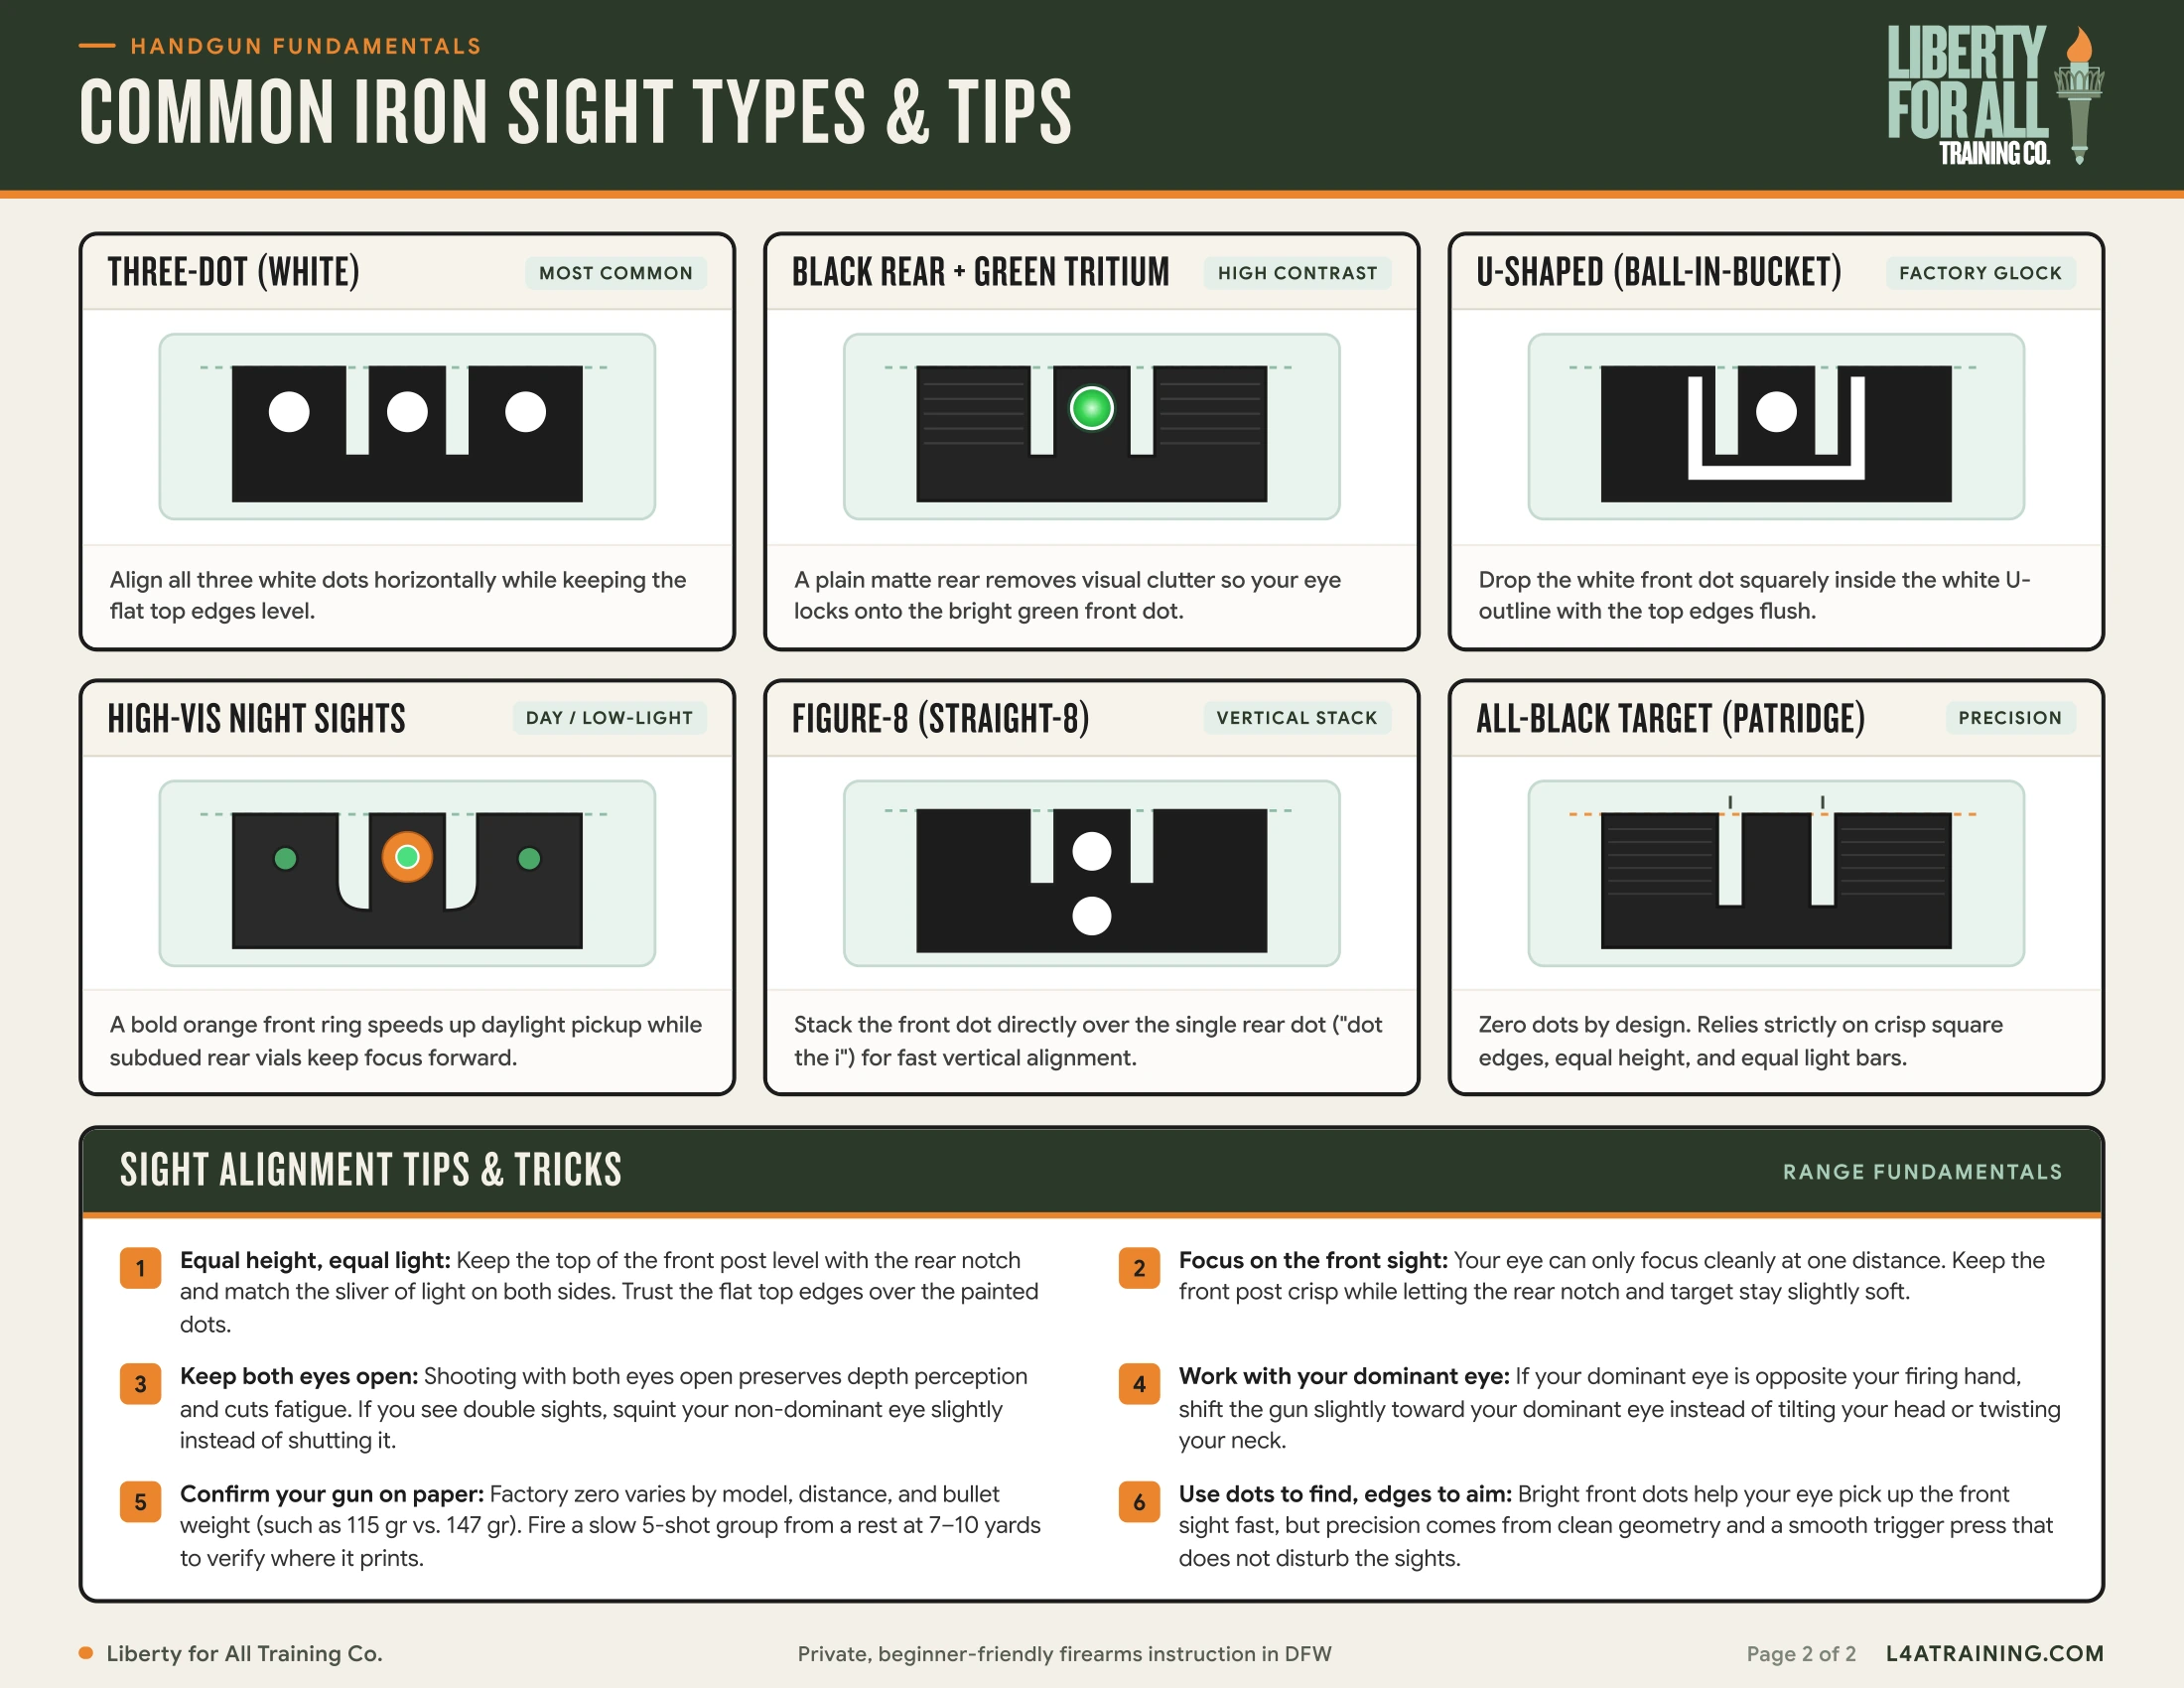
- Three-Dot (White): The default factory setup on most pistols. Line up all three white dots in a horizontal row, then double-check that the flat top edges of the front post and rear notch are flush.
- Blacked-Out Rear + Green Tritium Front: A plain, matte serrated rear sight paired with a glowing green tritium front dot. Removing rear dots eliminates visual clutter so your eye snaps straight to the front sight.
- U-Shaped (Ball-in-Bucket): The classic factory Glock sight picture. Seat the white front dot squarely inside the white U-shaped rear outline with the top edges completely level.
- High-Vis Night Sights: A bold orange front ring around a green tritium core paired with two smaller, subdued green rear vials. The bright ring speeds up daylight pickup while the dimmer rear keeps your focus forward in low light.
- Figure-8 (Straight-8): One dot on the front post and one dot centered underneath the rear notch. Stack the front dot directly over the rear dot ("dot the i") for simple vertical alignment.
- All-Black Target (Patridge): Zero paint and zero dots by design. Relies strictly on crisp square edges, equal height across the top, and equal slivers of light on both sides of the front blade.
Six Sight Alignment Tips That Actually Matter on the Range
- Equal height, equal light: Keep the top of the front post level with the top of the rear notch and match the sliver of light on both sides. Trust the flat top edges over the painted dots.
- Focus on the front sight: Your eye can only focus cleanly at one distance. Keep the front post sharp while letting the rear notch and the target stay slightly soft.
- Keep both eyes open: Shooting with both eyes open preserves depth perception and reduces eye fatigue. If you see double sights, squint your non-dominant eye slightly instead of clamping it shut.
- Work with your dominant eye: Your dominant eye does not always match your dominant hand. If you are cross-dominant, bring the pistol slightly over in front of your dominant eye instead of tilting your head or craning your neck.
- Confirm your gun on paper: Before assuming your sights are off, fire a slow five-shot group from a seated or supported rest at 7 to 10 yards using the ammo you actually shoot.
- Use dots to find, edges to aim: Bright front dots help your eye pick up the front sight quickly, but tight groups come from clean sight geometry and a smooth trigger press that does not disturb the muzzle as the shot breaks.
Want to Test Different Sights Side by Side?
Reading diagrams helps, but nothing beats seeing how a blacked-out rear, a factory U-notch, and high-vis night sights actually look to your own eyes under indoor range lighting. In every private session we provide the loaner handguns, ammunition, targets, eye and ear protection, and range fees.
- Book a 1-Hour Private 1-on-1 Lesson ($119) → or 90-Minute Extended 1-on-1 ($149) →
- Book Try Before You Buy ($149 Solo) → or Try Before You Buy for Two ($199) → (Compare multiple handguns and sight styles before spending $500+ at the gun counter.)
- Book a Couples / 2-Shooter Lesson ($149 / 1 hr) → or 90-Minute 2-Shooter Lesson ($199) →
- Download the Free 2-Page Printable Iron Sights PDF →
Have a question about your pistol's sights before you book? Text us at 214-316-1513.
Explore more: Book a Lesson · Try Before You Buy · First-Timer's Range Checklist · What We Shoot · 9mm Bullet Weight Guide · How to Buy a Handgun in Texas